MongoDB as Backend
For the first time, I have created a backend for my installed MongoDB database.
You want to have this on your browser? Then follow the text below:
What is MongoDB
MongoDB is a document-oriented NoSQL database that stores data in flexible, JSON-like documents, allowing for easy storage and retrieval of structured, semi-structured, and unstructured data. Unlike traditional relational databases that use tables and rows, MongoDB uses collections and documents, making it more adaptable to changing data structures. It was designed to handle large volumes of data and is known for its scalability, flexibility, and ease of use.
On Linux, you can check the status of the server with sudo systemctl status mongod. On Windows in the PowerShell, the command is: Get-Service -Name MongoDB
What is a backend?
What is the Backend? (Explained Simply)
The Backend is the part of a website or application that the user cannot see. It’s the „behind-the-scenes“ engine that makes everything work.
- It’s often called the Server-Side.
- It handles the logic, the data, and the connections to the database.
Think of your current project like a restaurant:
| Role in Real Life | Your Project (The Backend) |
| The Chef (Express.js) | The Server. It takes your order (the search request) from the kitchen window (the API endpoint). |
| The Storeroom (MongoDB) | The Database. This is where all the ingredients (your blog articles and data) are stored. |
| The Manager (Mongoose) | The Translator. It ensures the Chef and the Storeroom understand each other. It helps search the data correctly. |
| The Waiter (The API) | The API (Application Programming Interface). This is the only way the visible part (the search box) can talk to the Chef and the Storeroom. |
The requirements:
We need JavaScript for this project. We need JavaScript for this project. While traditionally a browser language, we use Node.js (the JavaScript runtime environment) to execute JavaScript code on the server-side (backend).
For the action what it can do, you need other programs and during the past the developers had developed a lot of new programs. One is of them is Node.js.
Here in my Fedora 42 pc you install Nodej.js with the command: sudo dnf install nodejs.
In order to install the different frameworks, other programs that are worked together with Node.js you need a program that can install it. In this case, it is npm (the former name was: Node Package Manager). With the installation of node.js the npm will be installed with it.
For our project, we need the frameworks Express.js and Mongoose.
Express.js: Is the Web Server and handles the routing (defining API endpoints).
Mongoose: Is the Object Data Modeler (ODM) that provides the structure (Schema) and simplifies the database connection and querying for MongoDB.
The command is:
npm install express mongoose
First we create a folder with the name mongo_api and we go into this folder.
Then we create the file: server.js.
// Datei: server.js
const express = require('express');
const mongoose = require('mongoose');
const app = express();
const PORT = 3000;
const DB_URI = 'mongodb://localhost:27017/meinDatenbankName'; // HIER DB-NAMEN ANPASSEN
// --- Datenbankverbindung ---
mongoose.connect(DB_URI)
.then(() => console.log('✅ MongoDB erfolgreich verbunden.'))
.catch(err => {
console.error('❌ MongoDB Verbindung fehlgeschlagen:', err.message);
console.log('Stellen Sie sicher, dass der MongoDB-Dienst läuft!');
});
// --- Express Routing (Einfacher Test) ---
app.get('/', (req, res) => {
res.send('API läuft! Status: ' + mongoose.connection.readyState);
});
// --- Server starten ---
app.listen(PORT, () => {
console.log(`Server läuft auf http://localhost:${PORT}`);
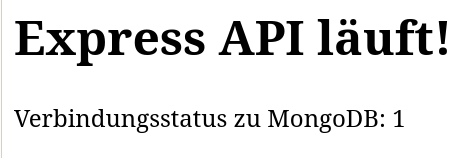
});In order to check the connection, we go back to our terminal and run the command node server.js

Now it connected
You can go into your browser and open the URL http://localhost:3000 then this will appear:
Now we can create the Mongoose model with this script in the server.js (we can overwrite it, the first script was only a test).
// server.js

// **********************************************
// 1. MODULE IMPORTIEREN (Müssen am Anfang stehen)
// **********************************************
const express = require('express');
const mongoose = require('mongoose');

// **********************************************
// 2. KONFIGURATION & MODELL DEFINITION
// **********************************************
const app = express();
const PORT = 3000;
const DB_URI = 'mongodb://localhost:27017/Artikel'; // Datenbanknamen angepasst!

// --- 2a. Mongoose Schema definieren ---
const nachrichtenSchema = new mongoose.Schema({
    Titel: {
        type: String,
        required: true,
        index: true
    },
    Inhalt: String,
    Autor: String,
    Datum: {
        type: Date,
        default: Date.now
    }
});

// --- 2b. Das Modell erstellen ---
const Nachricht = mongoose.model('Nachricht', nachrichtenSchema);


// **********************************************
// 3. MIDDLEWARE & DATENBANKVERBINDUNG
// **********************************************

// WICHTIG: Middleware für JSON-Parsing. Muss vor den Routen stehen,
// die Daten im Body erwarten (wie z.B. der Such-Endpunkt).
app.use(express.json());

// --- Datenbankverbindung ---
mongoose.connect(DB_URI)
    .then(() => console.log('✅ MongoDB erfolgreich verbunden.'))
    .catch(err => {
        console.error('❌ MongoDB Verbindung fehlgeschlagen:', err.message);
        console.log('Tipp: Ist Ihr MongoDB-Dienst (z.B. mongod) aktiv?');
    });


// **********************************************
// 4. EXPRESS ROUTING (API-ENDPUNKTE)
// **********************************************

// --- 4a. Basis Test-Endpunkt ---
app.get('/', (req, res) => {
    res.send(`<h1>Express API läuft!</h1>Verbindungsstatus zu MongoDB: ${mongoose.connection.readyState}`);
});

// --- 4b. Endpunkt zum Erstellen von Testdaten ---
app.post('/api/nachricht', async (req, res) => {
    try {
        const neueNachricht = new Nachricht(req.body);
        await neueNachricht.save();
        res.status(201).json(neueNachricht);
    } catch (error) {
        res.status(400).send({ message: 'Fehler beim Speichern der Nachricht.', error: error.message });
    }
});


// --- 4c. Such-Endpunkt (Regex-Abfrage) ---
app.post('/api/suche', async (req, res) => {
    try {
        const suchwort = req.body.suchwort;

        if (!suchwort) {
            return res.status(400).send({ message: 'Suchwort fehlt im Request Body.' });
        }

        // Führt die MongoDB-Regex-Abfrage aus
        const ergebnisse = await Nachricht.find({
            Titel: {
                $regex: suchwort,
                $options: 'i' // 'i' für Case-Insensitive
            }
        });

        res.json({
            abfrage: `Titel mit Regex: /${suchwort}/i`,
            anzahl: ergebnisse.length,
            ergebnisse: ergebnisse
        });

    } catch (error) {
        res.status(500).send({ error: error.message });
    }
});


// **********************************************
// 5. SERVER STARTEN
// **********************************************
app.listen(PORT, () => {
    console.log(`🚀 Server gestartet auf http://localhost:${PORT}`);
});
After that, we can create test data with the command:
curl -X POST http://localhost:3000/api/nachricht \ -H „Content-Type: application/json“ \ -d ‚{„Titel“: „Artikel von Sven Müller“, „Inhalt“: „Dies ist ein Test.“, „Autor“: „Sven“}‘
It should work.
For the web interface, we need an HTML/CSS file with the name index.html. This file is saved in the folder mongo_api. Here is an easy form:
<!DOCTYPE html>
<html lang="de">
<head>
    <meta charset="UTF-8">
    <title>MongoDB Regex Suche</title>
    <style>
        body { font-family: sans-serif; max-width: 600px; margin: 0 auto; padding: 20px; }
        input[type="text"] { width: 100%; padding: 10px; margin: 10px 0; }
        button { padding: 10px 15px; background-color: #007bff; color: white; border: none; cursor: pointer; }
        #ergebnisse { margin-top: 20px; border: 1px solid #ccc; padding: 10px; white-space: pre-wrap; background-color: #f4f4f4; }
    </style>
</head>
<body>
    <h1>MongoDB-Suche (Express.js API)</h1>

    <h2>1. Suche nach Titel (Regex)</h2>
    <input type="text" id="suchfeld" placeholder="Geben Sie den Suchbegriff ein (z.B. Sven)">
    <button onclick="sucheAusfuehren()">Suchen</button>

    <h2>Ergebnisse:</h2>
    <div id="ergebnisse">Hier werden die JSON-Ergebnisse angezeigt...</div>

    <script>
        async function sucheAusfuehren() {
            const suchwort = document.getElementById('suchfeld').value;
            const ergebnisDiv = document.getElementById('ergebnisse');
            ergebnisDiv.textContent = 'Suche läuft...';

            try {
                // Senden einer POST-Anfrage an den /api/suche Endpunkt
                const response = await fetch('http://localhost:3000/api/suche', {
                    method: 'POST',
                    headers: {
                        'Content-Type': 'application/json',
                    },
                    // Der Request-Body muss das erwartete JSON-Format haben
                    body: JSON.stringify({ suchwort: suchwort })
                });

                const daten = await response.json();

                if (response.ok) {
                    // JSON-Daten formatiert anzeigen
                    ergebnisDiv.textContent = JSON.stringify(daten, null, 2);
                } else {
                    ergebnisDiv.textContent = `Fehler (${response.status}): ${daten.message}`;
                }

            } catch (error) {
                ergebnisDiv.textContent = `Netzwerkfehler: ${error.message}. Ist der Server (node server.js) aktiv?`;
            }
        }
    </script>
</body>
</html>
The Critical Missing Piece: CORS
Important: The CORS Hurdle: When you open the local index.html file in your browser, you might encounter a „NetworkError“ or a CORS (Cross-Origin Resource Sharing) error. This is because the browser blocks communication between a local file (file:///...) and your running server (http://localhost:3000) for security. The Fix: We must install the cors package and tell our Express server to accept requests from any origin.
- Install the package:
npm install cors - Add it to your
server.js(under 1. MODULE IMPORTIEREN and 3. MIDDLEWARE):
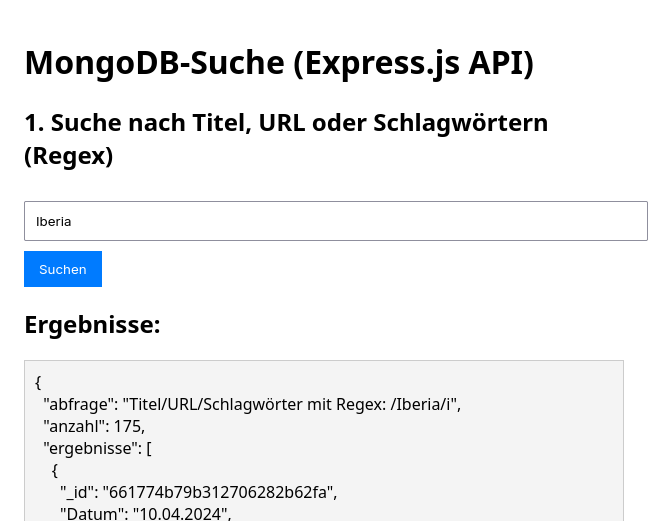
In order to check it, open your browser -> CTRL + O , search for the index.html file in the folder mongo_api and open it.
Then you should see something like this.